
You will see many online compressors claiming to convert your images to 20KB / 40KB / 200KB/ 1MB. Or they look the image within specific dimension (like 600×400). This often happens when you are trying to upload an image to a website that limits you from uploading larger image (government websites are notorious for this requirement).
These are often personal documents (such as an ID card or driving license) that contain sensitive information. I wouldn’t trust online converters for handling these. If you value your privacy, you’ll likely want an offline converter that can achieve the same results.
Mass Image Compressor can be handy here. It’s a free tool, doesn’t send any data outside your computer and trusted by the community for over 15+ years – available on Windows and Mac. You can use Mass Image Compressor to convert a photo of your document (HEIC/JPG) to desired size. Here is guide on how to achieve it.
In this article, we are using Mac version of Mass Image Compressor but Windows version of Mass Image Compressor can achieve the same.
Step 0: Download Mass Image Compressor
Visit the Download page of Mass Image Compressor to download Window of Mac version.
NOTE: Mass Image Compressor is available on Window and Mac. No Android/iOS port available as of Aug 2025.
Step 1: Open Photo
- Open Mass Image Compressor
- Drag & Drop your image to the Mass Image Compressor. Mass Image Compressor allows you to compress multiple images but in this case, you may want to handle just one image at a time.
Tip: You can right click the image and use “Open With” option on Mac while “Send To” option with Windows version.
You will see something like this below in screenshot.
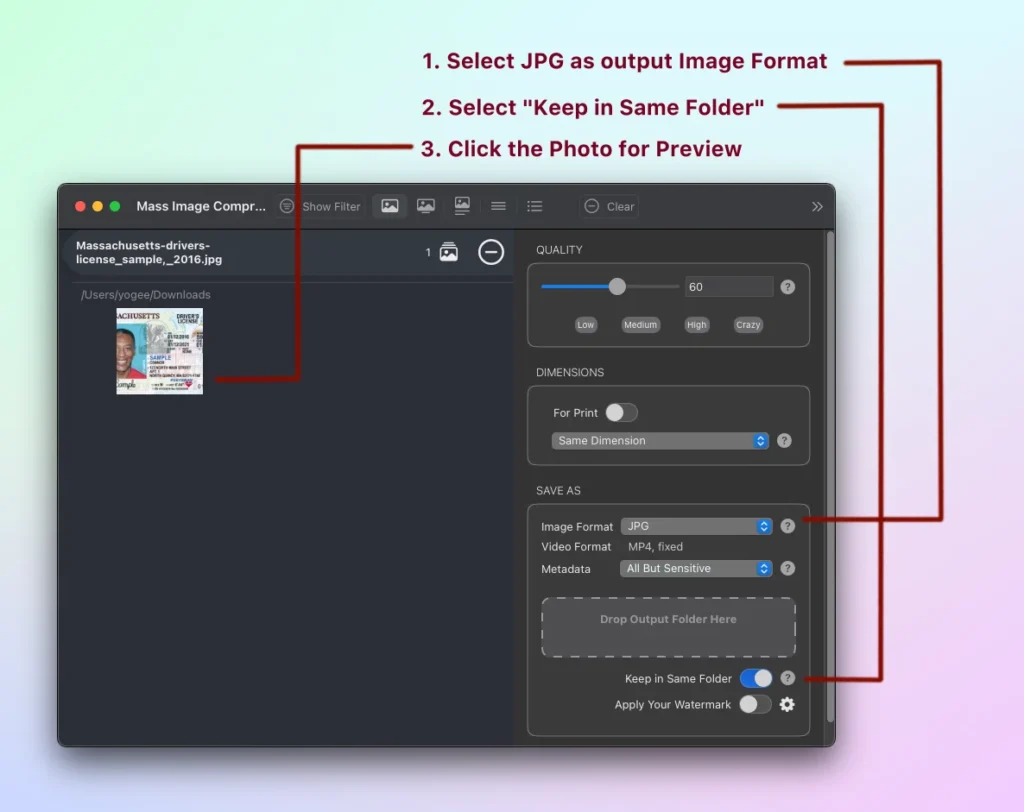
Follow this steps once you see your target image thumbnail (or in the list based on your view setting).
- Select JPG as output Image Format. Most website accepts upload of JPG or PNG images. Photographs taken from camera/scanner are always larger with PNG. So select JPG as your output format. NOTE: JPEG and JPG are same format.
- Select “Keep in Same Folder”. This is just for your convenience, you may select any folder of your choice. Note that Mass Image Compressor doesn’t override your original image if you choose “Keep in Same Folder” option but it creates output image with “_compressed” suffix.
- Now click on the thumbnail image to go to live compression preview screen to adjust more settings. NOTE: Optionally, you can also choose to remove “Metadata” (such as geo tags, camera information etc.). Those are NOT required.
Now your basic compression settings are set and you are ready for the next step.
Step 2: Adjust Compression Settings
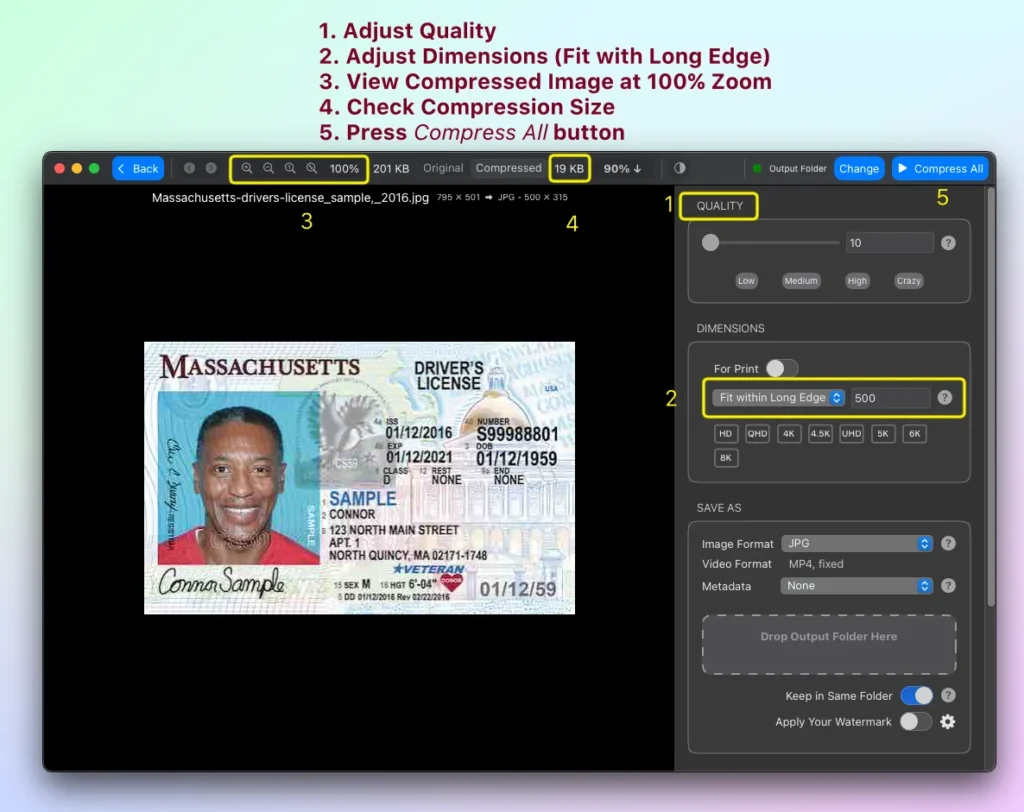
No other software provides you live compression preview like Mass Image Compressor does. Once you click the thumbnail of the target image, you will come to compression preview screen which looks like below.
Observer and Ensure
- Here, on this screen, ensure that you are on “Compressed” tab (shown between 3 and 4 in above screenshot.
- You are looking at zoom level 100% (see “3” in above image). You may have to make the window larger if you are not seeing the zoom options.
Your next goal is to achieve desired output size of your image with quality that you prefer. To do so,
- From Dimensions settings, select “Fit within Long Edge” to resize the image (see “2” in above image) This is important as images taken from camera or scanner are always huge as they are created for printing in purpose. We do not need that much large image to view on the screen. Change the long edge and see how the image looks as “Compressed” and at 100% zoom.
- Note “Compressed” size (“4” in above image). is it within your desired range? If not, adjust quality (“1” in above image).
- Once you are satisfied with image quality and size of the preview image, hit the Compress All button. As Mass Image Compressor run in sandbox environment on macOS, uou may see a popup with “Grant Access to Folder” button that asks for your permission to access the folder, just hit the “Grant Access to Folder” button, do not change the output folder otherwise compression will fail. This happens only on the Mac and happens only in certain case (e.g. with Keep in Same Folder Option) when Mass Image Compressor doesn’t have access to the folder.

All done. You will see your reduced size photo in the same folder with “_compressed” suffix.
Other Image Compressors
Online: I do not vilify all online compressors, some of them priorities user privacy. But then they cannot match performance and features of an offline converter. Offline converters such as Mass Image Compressor are often one-stop solution for most image compression needs – why learn multiple software when you have single solution?
Offline: There are many notable image compression software that installs on your computer. Some of them are open source just like Mass Image Compressor (windows version source code here). Almost of them are good and uses same standard libraries that Mass Image Compressor uses. Mass Image Compressor is recommended for this flow especially due to its ability to show accurate and live compression preview.
Congratulations
Now you are expert in reducing the image size with speed, accuracy and in privacy friendly manner. This may sound ‘many steps’ initially but it’s must faster than struggling with websites which doesn’t give you actual preview of how images, or doesn’t allow you to change dimensions. With Mass Image Compressor, you do not need second attempt!
Leave a Reply