
Help Center
Preview Before You Compress
Compressing images is essential for web performance, email attachments, and storage management, but blind compression can lead to unwanted quality loss or unexpected artifacts. Mass Image Compressor’s Live Preview feature ensures you know exactly how your images will look and how much space you’ll save before you ever hit “Compress All”.
Mass Image Compressor’s Live Preview stands out because it:
- Delivers Instant Feedback without waiting for full-batch compression.
- Empowers Precise Control—you see exactly what you’ll get.
- Reduces Risk of over-compression and re-work.
- Streamlines Workflow by keeping you in one UI for tweaking and inspection.
Whether you’re a professional photographer vetting images for a gallery or a web developer optimizing assets for a site, Live Preview elevates your confidence in every pixel and byte saved.
This guide will help you how to use and navigate the Live Preview view of Mass Image Compressor.
1. Entering Live Preview
- Gallery View → Live Preview
- In the main Gallery, simply click any thumbnail or file name to jump into Live Preview.
- You’ll instantly see that image centered on the left, with its original filename and dimensions in a small overlay at the top.
- Seamless Context Switch
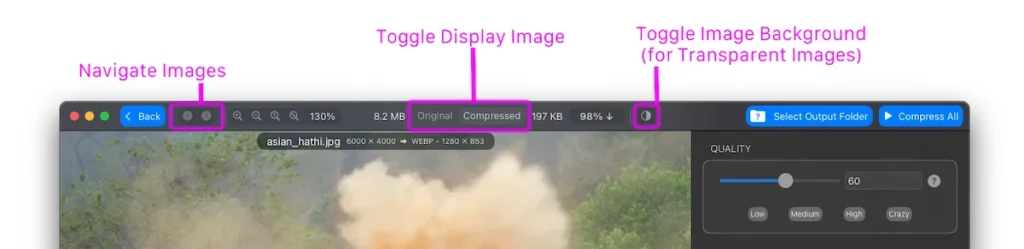
- Above the preview, the toolbar shows “Back,” navigation arrows, and zoom controls—so you never lose your place in the batch.
- Hit Back or press Esc at any time to return to the Gallery.
2. Live, Real-Time Compression Feedback
On the right side, the Settings Panel awaits to show you compression preview:
- Quality
- Dimension
- Output Format and Metadata
As you tweak quality or dimensions, the Live Preview redraws the compressed version in real time, no waiting through a full batch operation. This immediacy lets you dial in settings to match your visual and file-size goals.
3. Pixel-Perfect Original vs. Compressed Comparison
A core strength of Live Preview is the toggle between “Original” and “Compressed” views:
- Same Window, Same Scale
- Both images open at identical dimensions, so you can compare pixel-to-pixel sharpness, color fidelity, and artifacting.
- Instant Switch
- Click the “Original ↔ Compressed” button or press Space to flip back and forth seamlessly.
Whether evaluating fine texture in a portrait or crisp edges in a logo, you’ll catch even subtle compression artifacts before they become a problem.
4. File-Size & Dimension Insights at a Glance
Above the preview, Mass Image Compressor displays:
Original: 8.2 MB → Compressed: 197 KB (↓ 98%)CopyEditasian_hathi.jpg 6000 × 4000 ▶︎ WEBP 1280 × 853
- Filename & Original Dimensions remind you which image you’re inspecting.
- Output Format & New Dimensions confirm your chosen settings.
- Size Reduction Percentage quantifies the savings so you can hit size targets with confidence.
This real-time data empowers decisions: stop over-compressing critical images, or push harder on non-critical assets.
5. Zoom & Pan: Inspect Every Detail
Compression artifacts can be tiny. Live Preview includes full zoom and pan controls:
- On-Screen Buttons
- Use the ▲/▼ icons to zoom in/out.
- Drag to Pan
- Click and drag the image to inspect different areas at high zoom levels.
Zoom in on facial features, text, or fine lines and pan across the frame to ensure your compression settings preserve the fidelity you need.
PRO users Zoom-Key Tips (works only via Keyboard): if you’re at lower zoom level (e.g. 50%) and press ↑ key on your keyboard, the first press jumps you straight to 100%, then further presses adjust by 10%. At 140%, ↓ brings you back directly to 100%.
6. Navigating Your Batch
When you have dozens or hundreds of images:
- Next/Previous Buttons
- Located beside the “Back” button, click ◀︎ or ▶︎ to move through your selection without returning to Gallery. Pro subscribers can also use left/right arrow keys from your keyboard.
- Progressive Preview
- Each image loads instantly with your last-used settings, so you can spot-check quality across the batch before bulk-processing. Make sure you are in “Compressed” tab while navigating to see instant compression preview.
- If the images are heavy and you want to navigate to target image without seeing compression preview of intermediate images, remain in “Original” tab, navigate to the target image and click on “Compressed” to see the compression preview.
IMPORTANT: Compression Settings that you set are applied to All the Images of the batch. There is no way to setting compression parameter of a particular image.
7. Summing Up
- Enter Live Preview: Click any thumbnail.
- Adjust Settings: Quality, dimensions and watch the result update.
- Compare Originals: Toggle at pixel-level precision.
- Zoom & Pan: Inspect critical details.
- Navigate & Refine: Use buttons or keys to spot-check your batch.
- Exit: Press Esc or Back to return and review other images.
Once you’re satisfied with the compression options across your selection, hit Compress All button. Live Preview ensures you compress with surgical precision with maximizing savings while retaining the quality your project demands.
Enjoy the confidence that comes from seeing the end result first!